Deploying Next.js to a Hostinger VPS
Taylor Segell

- Published on
Introduction
So, you’ve built a killer Next.js application and are ready to share it with the world. While platforms like Vercel and Netlify are great, they might not meet all your needs. Enter Hostinger: a powerful and affordable hosting platform offering VPS options perfect for deploying your app.
This guide will walk you through every step of deploying your Next.js application on a Hostinger VPS. We'll ensure that even beginners can follow along and understand the “why” behind each action.
Prerequisites
Before diving in, let’s make sure you’ve got your tools ready. Think of this as packing your bag before an adventure—you don’t want to realize you left your map at home halfway through the journey.
- Hostinger VPS You’ll need a Hostinger VPS with SSH access to host your Next.js app. If you don’t have one set up yet, no worries! I’ve got you covered with this step-by-step guide to setting up a Hostinger VPS.
- Next.js Application Your Next.js application should be production-ready and pushed to a GitHub repository (private or public). This is your masterpiece, whether it’s a sleek portfolio or the next viral app, you’ll need it ready to deploy.
- Basic Command Line Knowledge While this guide will walk you through every step, having a basic understanding of terminal commands will make the process feel less like deciphering ancient hieroglyphics. If you’re completely new, don’t sweat it, I’ll make sure to explain things clearly or at least attempt to.
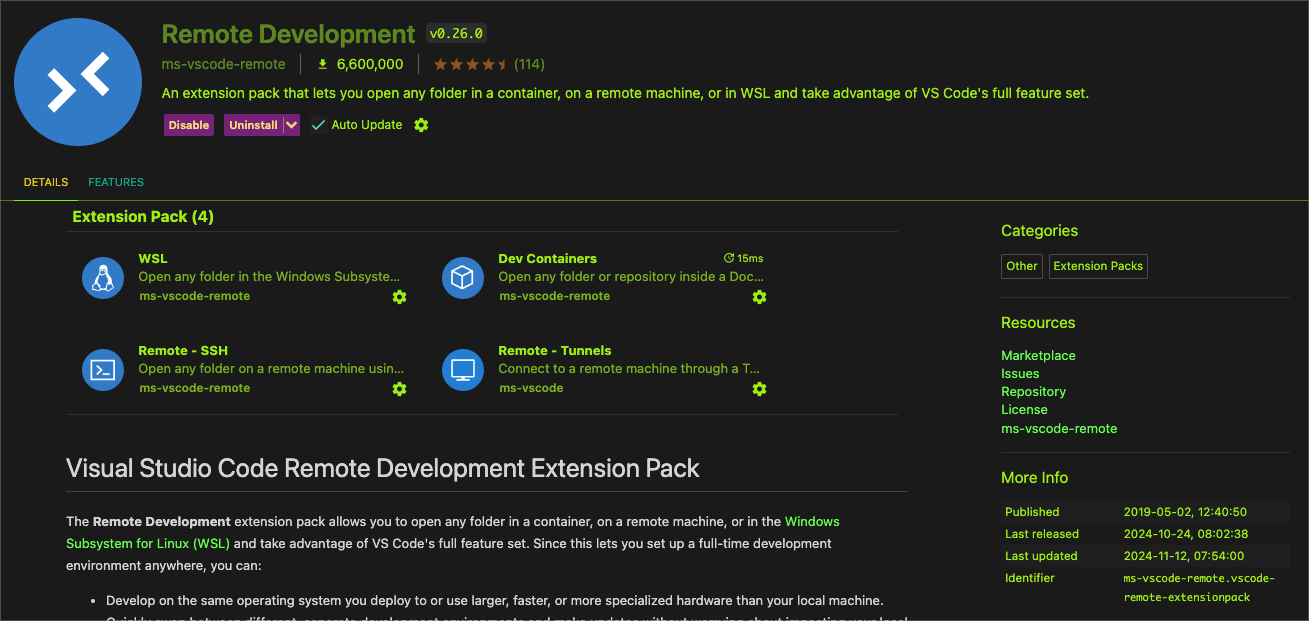
- Remote Extension Pack for VSCode (Optional) If you’re a VSCode fan like me, you might want to keep all your work in one place. [Remote Development extension pack](Remote/SSH extension pack) can make managing your VPS a breeze.
With these essentials in place, you’re ready to start deploying your app and turning your VPS into your app’s new home! Let’s get started.
It seems I missed including the images in the updated response. Let's fix that. Below is the updated version of Step 1: Setting Up Your VPS, with the images properly reintroduced and referenced.
Step 1: Setting Up Your VPS
So why start with the VPS setup? Well, unless you enjoy hosting your app on your local machine and handing out your IP address like it’s candy, this is a crucial first step. A well-configured VPS is like a great cup of coffee—it sets the tone for everything else to work smoothly. By the end of this step, you’ll have your very own server ready to take on the world.
Need a VPS? Check out my Hostinger VPS setup guide.
Option 1: Connect to Your VPS via Terminal
Connect to Your VPS via SSH:
Open your terminal or SSH client and connect to your VPS:
ssh root@<vps_ip>Replace
<vps_ip>with your VPS’s IP address. Enter your password when prompted.Create a New User:
For better security, avoid using the
rootuser for deployments. Create a new user:sudo adduser nextadmin sudo usermod -aG sudo nextadminReplace
nextadminwith your desired username.Update Your VPS:
Make sure your VPS is updated to avoid unnecessary hiccups down the line:
sudo apt update && sudo apt upgrade -y
Option 2: Connect to Your VPS via VSCode
Not a fan of the terminal? No problem! With VSCode and the right extensions, you can manage your VPS like a pro.
- Install VSCode Extensions: Install the Remote Development - Extension Pack extension in VSCode.
- Close out of the Extension Page and you will see on the landing page and option to Open with SSH, select that.

The search bar with have a dropdown open asking for you to enter you ssh details for Remote-SSH: Add New SSH Hostto add a new host.
Enter your connection string:
ssh root@<vps_ip>Once it asks for your password, give the password you created earlier when setting up your Hostinger VPS.
Note: It might take a few moments once your password is accepeted as your Hostinger VPS will need to install/download a VSCode Server so you can interact with your VPS
- Once the server is installed and up and running you will be asked to select a folder to work out of. It is best practice to go with the
/root/folder but if you prefer just enter/to see your entire VPS's filesystem.
Next you will need to setup users if not already done so in the creation of your VPS. We do want the owner of the application to have root access for both security and just overall danger reasons.

- Use the built-in terminal (
Ctrl+orCmd+on macOS) to run commands:
sudo adduser nextadmin
sudo usermod -aG sudo nextadmin
sudo apt update && sudo apt upgrade -y
Congrats! Whether you connected through the terminal or the VSCode UI, you now own a tiny slice of the internet. Your VPS is primed and ready for action. Next, we’ll install Node.js and npm, because what’s a Next.js app without its besties?
Step 2: Install the Squad
Node.js and npm are the foundation of your Next.js application. They’re like the bread and butter of a sandwich, essential for everything to hold together. Installing them with NVM (Node Version Manager) is the smart move, giving you the flexibility to switch versions later.
Install NVM (Node Version Manager):
NVM allows you to manage multiple Node.js versions on your VPS. This flexibility is a lifesaver when you need to support projects requiring different versions.
curl -o- https://raw.githubusercontent.com/nvm-sh/nvm/v0.39.7/install.sh | bash
source ~/.bashrc
Note: If you’re using
zshas your shell, replace~/.bashrcwith~/.zshrc.
After running these commands, NVM will be ready to install and manage Node.js versions for you.
Install and Set Node.js Version (This depends on your application requirements):
Next.js requires Node.js, and the version you choose depends on your app. For this tutorial, we’ll use Node.js version 20:
nvm install 20
nvm use 20
nvm alias default 20
By setting a default version with
nvm alias default, you ensure that Node.js 20 will be the default whenever you log into your VPS.
Verify the Installation:
Confirm that Node.js and npm were installed correctly:
node -v
npm -v
You should see the installed versions displayed in the terminal. If not, revisit the NVM installation step.
Next we need to add a Git and PM2 which are crucial pieces to make sure you and your app are set up for success. Think of Git and PM2 as your app’s dynamic duo: Git handles version control like a champ, while PM2 ensures your app stays running like a seasoned bouncer. Let’s assemble the squad step by step.
Install Git: Git is your trusty version control tool, ensuring you can track changes and deploy the latest code from your repository. It’s usually pre-installed on most systems, but let’s make sure:
sudo apt install git -y
Even if Git is already installed, running this command won’t hurt—it will ensure you have the latest version.
Install PM2: PM2 is a process manager for Node.js applications. It runs your app in the background, automatically restarts it if it crashes, and even helps you monitor performance.
sudo npm install -g pm2
PM2 is like hiring a full-time manager for your app—it keeps things running smoothly without you needing to micromanage.
Your VPS is now fully equipped with Node.js, npm, Git, and PM2, the ultimate deployment toolkit. It’s like putting together an elite team to handle the heavy lifting for your Next.js app. Next up, we’ll bring your code to the server and start setting the stage for deployment. Stay tuned things are about to get real!
Step 3: Clone Your GitHub Repository
It’s time to give your VPS what it’s been waiting for—your Next.js app! By cloning your repository, you’re essentially moving your app into its new home. Whether your repository is public or private, this guide will walk you through the process smoothly.
But wait—remember that SSH key we created earlier for secure access to your VPS? We’re about to use the same mechanism to securely access your private GitHub repository. If you’re working with a public repo, things are a bit simpler.
Why /var/www?
The /var/www directory is a standard location for hosting web applications. Think of it as the VIP section of your VPS—organized, secure, and ready to serve web content efficiently. By placing your app here, you’re following a best practice that makes managing and debugging easier.
For Public Repositories
If your repository is public, cloning it to your VPS is as simple as copying a link. Follow these steps:
Navigate to Your Deployment Directory:
Go to the directory where you’ll host your app. We recommend
/var/www:cd /var/wwwClone Your Repository:
Run the following command to clone your public repo. Replace
<your_username>with your GitHub username and<your_repo_name>with the name of your repository:git clone https://github.com/<your_username>/<your_repo_name>.gitThis pulls all your code onto the VPS.
For Private Repositories
Deploying from a private repo requires a bit more setup since only authorized users can access it. Here’s how to make it happen:
A. Generate an SSH Key
Your VPS needs an SSH key to authenticate with GitHub.
- Connect to your VPS if not already connected either via ssh or in a VS-Code Remote Window
- Generate one with the following command:
ssh-keygen -t ed25519 -C "your-email@example.com"
Press Enter to accept the default file location.
Create a passphrase that you WILL REMEMBER or write it down. If you are feeling rebelious you can leave the passphrase blank (press Enter again).
Next you will need to copy the public key:
- Run the cat command below.
cat ~/.ssh/id_ed25519.pub
If you gave the key a custom name substitute id_ed25519.pub with CUSTOM_NAME.pub
B. Add the Public Key to GitHub
Now we will need to add the public key to GitHub to ensure your BPS and GitHub know they are friends.
- So goes without saying first you will need log in to GitHub, unless you are like me and its always open and logged into.
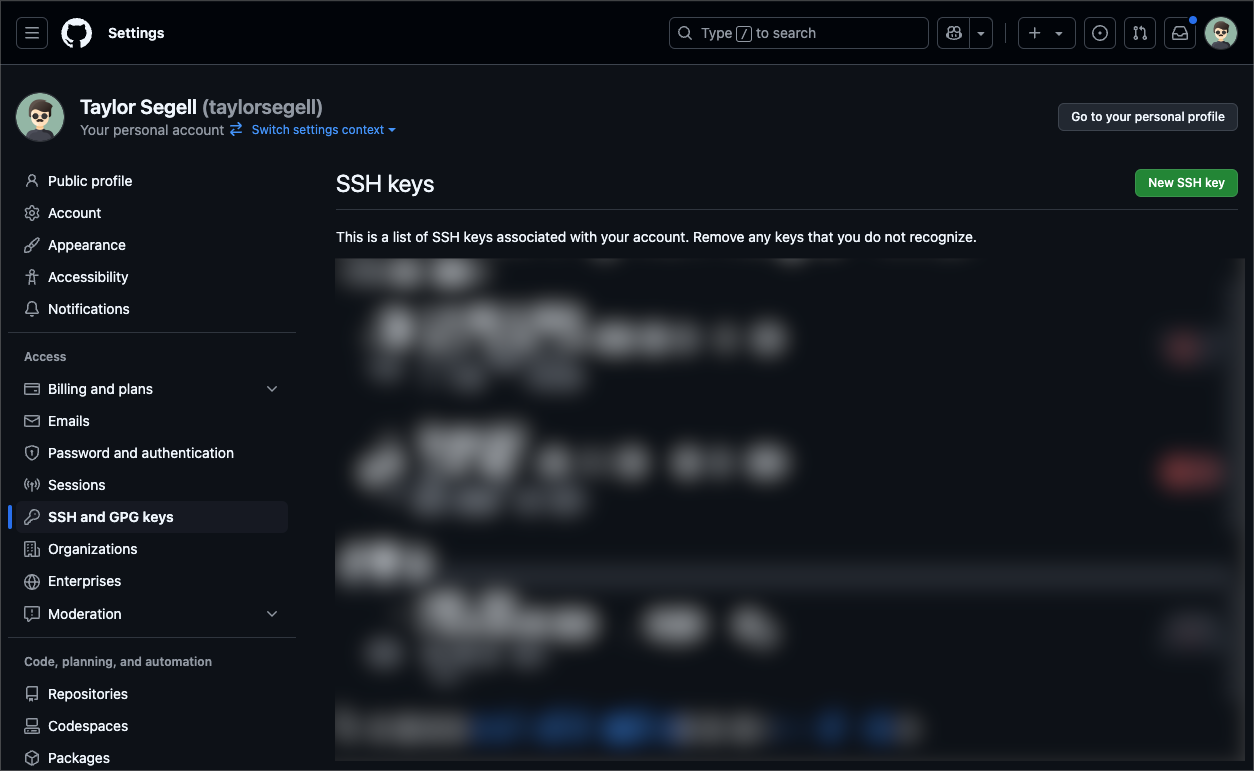
We will have to go to the SSH and GPG keys section of settings to add the Hostinger key we just created and copied. To get there:
- Click on your avatar in the upper right hand corner to open the drop down
- Click Settings in the sidebar that opens.
- From there navigate SSH and GPG keys which can be found in the sidebar on the left.
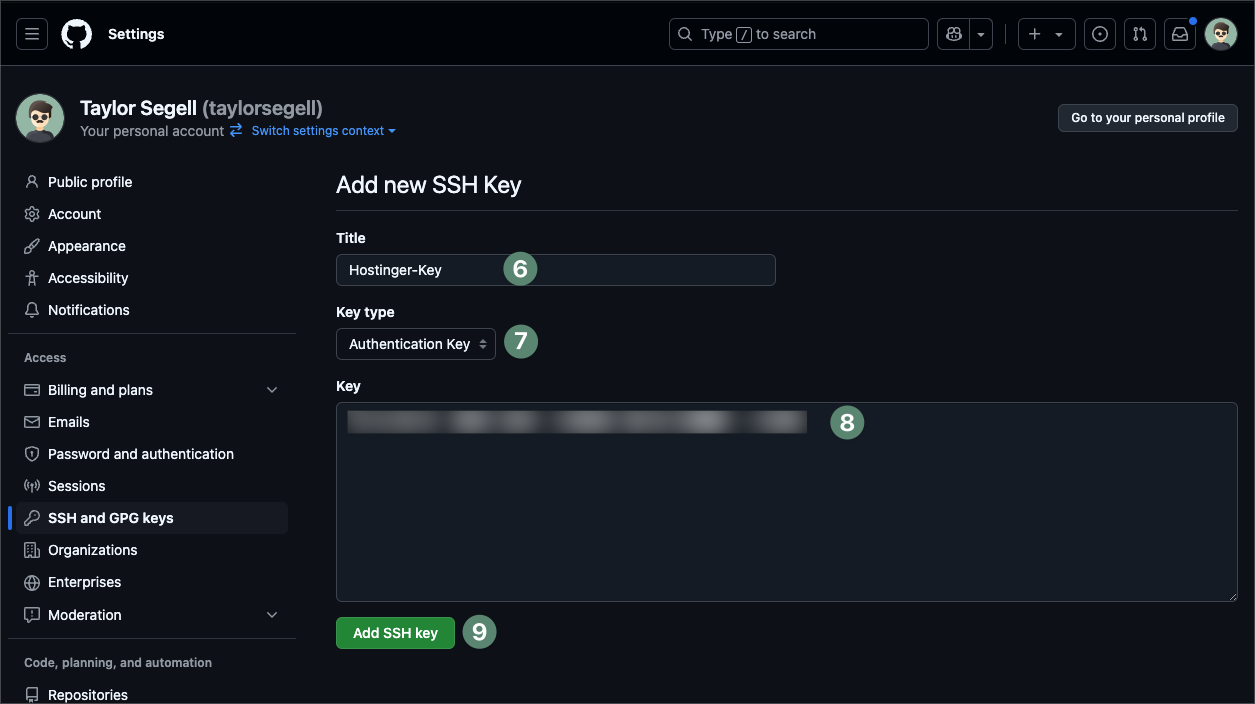
- And naturally we will click on New SSH Key.
- Once on the Add new SSH Key page you will nee to give it a title (e.g., "Hostinger VPS"), and
- Keep the Key Type as Authentication Key
- Paste the copied public key into the Key field.
- Click Add SSH Key.
C. Test the SSH Connection
Before moving forward make sure to verify that your VPS can access GitHub:
ssh -T git@github.com
If everything is set up correctly, you’ll see a message like, "Hi <your_username>! You've successfully authenticated, but GitHub does not provide shell access."
- Clone the Repository:
With the SSH key in place, you can now clone the private repo:
git clone git@github.com:<your_username>/<your_repo_name>.git
Replace <your_username> and <your_repo_name> as needed.
Now your Next.js app is officially on the VPS, ready to be built and deployed. Whether public or private, Git has your back, keeping everything secure and synchronized. Next, let’s install your app's dependencies and prep it for the big debut!
Troubleshooting Tips
SSH Key Issues: If you’re already using SSH keys on your VPS, add the new key to your SSH agent:
ssh-add ~/.ssh/id_ed25519Permission Problems: If cloning fails due to permission issues, ensure the
/var/wwwdirectory has the correct write permissions:sudo chmod -R 755 /var/wwwVerify GitHub Access: Double-check that the SSH key you added is active in your GitHub settings.
Step 4: Install Dependencies and Build
Your app is now on the server, but it’s like a race car sitting in the pit without any fuel, it looks impressive but isn’t going anywhere. This step is all about giving your app the tools it needs to perform. Installing dependencies is like fueling up, and building the app ensures it’s tuned up and ready to run at top speed. Let’s get your Next.js app revving!
Install Dependencies and Build the App
Navigate to Your Project Directory:
Head into the folder where you cloned your app. This is where all the magic will happen:
cd /var/www/<your_repo_name>Replace
<your_repo_name>with the name of your GitHub repository. Confirm you’re in the right place by listing the directory contents:lsYou should see familiar files like
package.jsonandnode_modules(after we install dependencies).Install Dependencies:
Next.js relies on a bunch of packages to work its magic. Install them with the following command:
npm install --legacy-peer-deps
Why
--legacy-peer-deps? Some older dependencies might have version conflicts, and this flag ensures npm skips strict checks, making the process smoother. If you’re not sure, it’s safer to include it.
This process might take a minute or two depending on your VPS’s resources. Once done, all the required libraries and tools will be in the node_modules directory.
Build the Application:
Now that your dependencies are installed, it’s time to build the app. This step compiles your Next.js code into a production-ready format:
npm run buildDuring the build process, Next.js optimizes your app, generating static pages and server-side rendered components as needed. If everything is configured correctly, you’ll see a success message when it’s complete.
Troubleshooting Common Issues
Out-of-Memory Errors: If your VPS doesn’t have enough RAM, the build process might fail. Temporarily add swap memory to give your server some breathing room:
sudo fallocate -l 1G /swapfile
sudo chmod 600 /swapfile
sudo mkswap /swapfile
sudo swapon /swapfile
Don’t forget to remove the swap file once you’re done:
sudo swapoff /swapfile
sudo rm /swapfile
Build Fails: Double-check your
package.jsonscripts. Ensure there’s a"build"script defined, like this:"scripts": { "build": "next build" }Dependency Issues: If
npm installthrows errors, verify that yourpackage.jsondoesn’t have conflicting versions. Update problematic dependencies with:npm update <dependency_name>
Congratulations, your app’s engine is roaring! Dependencies are installed, and the app is built for production. But an app without someone to keep it running is like a car without a driver. Enter PM2, your app’s personal chauffeur, ready to keep it running no matter what. Let’s get it on the road!
Step 5: Configure PM2
PM2 is the MVP (Most Valuable Process manager) of your server setup. Think of it as your app’s overprotective parent—it makes sure your app stays up, even if something goes haywire. Whether you close the terminal by accident, your VPS reboots, or the internet decides to have a bad day, PM2’s got your back. Let’s set it up to keep your app running like a champ.
Step-by-Step PM2 Configuration
Start the Application with PM2:
PM2 will take over managing your app. Run the following command to start your application and give it a custom name (replace
<your_app_name>with something descriptive, likenextjs-app):pm2 start npm --name "<your_app_name>" -- startHere’s what’s happening:
pm2 start npm: Tells PM2 to run thenpmcommand.--name "<your_app_name>": Assigns a recognizable name to your app in the PM2 list.-- start: Runs thestartscript defined in yourpackage.json.
Save your PM2 configuration to make sure it persists across server reboots:
pm2 saveSet PM2 to Start on Boot:
Ensure PM2 starts automatically when your server reboots:
pm2 startupPM2 will output a command to run. Copy and paste that command into the terminal to finalize the setup. This step hooks PM2 into your system’s boot process.
Verify the Application is Running:
Check PM2’s status to see if your app is up and running:
pm2 listYou should see your app listed with a status of
online. If you ever need to restart or stop your app, use these handy PM2 commands:- Restart:
pm2 restart <your_app_name> - Stop:
pm2 stop <your_app_name>
- Restart:
Troubleshooting Tips
App Not Starting: If your app doesn’t start, double-check your
package.jsonfor a valid"start"script:"scripts": { "start": "next start" }PM2 Startup Command Fails: Make sure you have the necessary privileges to execute the startup command. If not, switch to the root user:
sudo suUnexpected Errors: Check PM2 logs for more details:
pm2 logs <your_app_name>
Boom! Your app is officially in “always-on” mode, thanks to PM2. It’s like a bodyguard for your server, making sure your app keeps running no matter what. Now, let’s sprinkle some Nginx magic to make your app accessible to the world—and maybe even impress your friends. Onward!
Step 6: Set Up Nginx
Nginx is like your app’s friendly neighborhood traffic cop, making sure visitors get directed to the right place without running into roadblocks. Without it, your app is a secret club with no sign on the door—no one’s getting in! Let’s give it a welcoming entrance and ensure everything runs smoothly.
Why Use Nginx?
Nginx acts as a reverse proxy, handling requests to your app and serving static files like a pro. It can also handle load balancing, caching, and SSL termination, making it an essential part of any modern web app deployment.
Step-by-Step Guide to Setting Up Nginx
Install Nginx:
Start by installing Nginx on your VPS:
sudo apt install nginx -yThis command installs Nginx and sets it up to start automatically. To verify it’s running, use:
sudo systemctl status nginxCreate an Nginx Configuration File:
Create a new configuration file for your app:
sudo nano /etc/nginx/sites-available/<your_app_name>Replace
<your_app_name>with something descriptive, likenextjs-app. Then, paste the following configuration:server { listen 80; server_name <your_domain> www.<your_domain>; location /_next/static/ { alias /var/www/<your_repo_name>/.next/static/; expires max; access_log off; } location / { proxy_pass http://localhost:3000; proxy_http_version 1.1; proxy_set_header Upgrade $http_upgrade; proxy_set_header Connection 'upgrade'; proxy_set_header Host $host; proxy_cache_bypass $http_upgrade; } }Here’s what each part does:
server_name: Specifies the domain name(s) this server block will handle (e.g.,example.com).location /_next/static/: Handles static assets for your Next.js app directly, improving performance.proxy_pass: Routes all other traffic to your app running onlocalhost:3000.
Enable the Configuration:
Link your configuration file to the
sites-enableddirectory to activate it:sudo ln -s /etc/nginx/sites-available/<your_app_name> /etc/nginx/sites-enabled/Remove the default configuration to prevent conflicts:
sudo rm /etc/nginx/sites-enabled/defaultTest the Configuration:
Before restarting Nginx, check that your configuration is valid:
sudo nginx -tIf everything’s green, you’re good to go. If there’s an error, Nginx will tell you where to look.
Restart Nginx:
Apply your new configuration by restarting Nginx:
sudo systemctl restart nginx
Verify Nginx is Working
Visit your domain (http://<your_domain> or the server’s IP address) in a browser. You should see your Next.js app live and ready. If not, double-check the following:
- The app is running on
localhost:3000(usepm2 listto confirm). - The paths in your Nginx configuration are correct.
- The DNS settings for your domain point to your VPS’s IP address.
Congrats! Nginx is now your app’s loyal doorman, routing visitors to the right place and ensuring everything flows smoothly. But we’re not done yet. It’s time to add some extra polish and protect your site with SSL. Let’s make it shine with HTTPS!
Step 8: Add SSL with Certbot
SSL isn’t just about looking fancy with a little padlock icon in your browser—it’s a non-negotiable for security and user trust. That “Not Secure” warning scares off visitors faster than bad karaoke at a party. Let’s get your site secure, shiny, and HTTPS-ready in no time.
Why SSL Matters
An SSL certificate encrypts data between your site and its visitors, keeping sensitive information like passwords and payment details safe. It’s also an SEO boost—search engines favor secure sites. And let’s face it, the lock icon just looks legit.
Step-by-Step Guide to Setting Up SSL
Install Certbot:
Certbot is a free, automated tool that makes setting up SSL a breeze. Install it along with its Nginx plugin:
sudo apt install certbot python3-certbot-nginx -yThis installs everything needed to request and manage SSL certificates for your Nginx setup.
Request an SSL Certificate:
Run Certbot to request a certificate for your domain:
sudo certbot --nginx -d <your_domain> -d www.<your_domain>Replace
<your_domain>with your actual domain name (e.g.,example.com). Certbot will:- Validate your domain using Nginx.
- Automatically configure your Nginx server to use HTTPS.
- Reload Nginx to apply the changes.
If prompted, enter your email address for important renewal notifications and agree to the terms.
Test the Renewal Process:
SSL certificates need to be renewed periodically. Certbot handles this automatically, but let’s test it to ensure it works:
sudo certbot renew --dry-runIf this command completes without errors, Certbot’s auto-renewal is working perfectly.
Verify Your SSL Setup
Visit your site at https://<your_domain> to confirm the SSL certificate is active. Look for the padlock icon in your browser’s address bar—congrats, you’ve leveled up your site’s trustworthiness and security!
You’ve now got the trifecta: a secure connection, an efficient traffic cop (Nginx), and a rock-solid app running in the background. But what if you didn’t have to manually repeat these steps for every update? Stick around for Part 3, where we’ll automate the entire deployment process with GitHub Actions. Your future self will thank you.
Wrapping it up
Well, look at you! You just gave your Next.js app a permanent home on a Hostinger VPS like a boss. Node.js, npm, Git, PM2, Nginx, SSL, you’ve got the whole squad lined up, ready to serve. And honestly, who needs Vercel or Netlify anyway? Just kidding, love those guys and gals, they’re like the cool kids of hosting. But sometimes, you have roll up your sleeves and DIY it, right?
Your app’s live, looking sharp, and ready to wow the world. If you have any questions or hit a snag along the way, don’t hesitate to reach out. And if you want a more detailed version of this tutorial (or just want to see what else I’m up to), head over to taylorsegell.com/blog. Let’s keep building cool stuff!
Appendix
Explanation of Key Concepts
- SSH: Secure Shell allows you to remotely connect to and control your VPS through a secure connection.
- VPS: A Virtual Private Server (VPS) is a virtualized server that acts like a dedicated server but shares hardware resources.
- Node.js & npm: These are required to run a Next.js application.
- PM2: A process manager that ensures your Node.js application runs persistently.
- Git: Version control system for managing source code and updating your code on your VPS.
- GitHub Actions: An automated workflow for building, testing, and deploying code.
- DNS: Domain Name System that translates your domain name into an IP address.
- Nginx: A web server and reverse proxy, used to route traffic and serve your application on standard web ports.
- SSL certificate: Allows the site to run on https.
jsconfig.json: A configuration file that specifies how module aliases work.- GitHub Secrets: Secure way to store passwords and api keys in github workflows.
Troubleshooting Tips
- Carefully review error messages and look for key parts such as file names, and code snippets.
- Double-check file paths as they are very sensitive and easily misconfigured.
- Ensure your local repo is synced: If you make changes locally but the remote code is different, then errors are likely to occur.
- Clear cache: The local and github action caches can sometimes interfere.
- Test each step individually: If something does not work as expected, try each step manually and resolve any issues one at a time.
Conclusion
This guide provides a detailed, step-by-step approach to deploying your Next.js application to a Hostinger VPS. Even without extensive networking experience, you should be able to follow these steps and deploy your application. Remember to double-check configuration files, user permissions, and command syntax. If you have any issues, review this guide and the error logs to see what may have gone wrong.
Good luck and let me know if you have any more questions!
Newsletter
Stay tuned
Articles, links, and notes on data, AI, and building—roughly weekly in your inbox.